
5-Step Workspace Onboarding Checklist
Step-by-step guide to completing the 5 required onboarding milestones to activate your WorkClock HQ workspace.
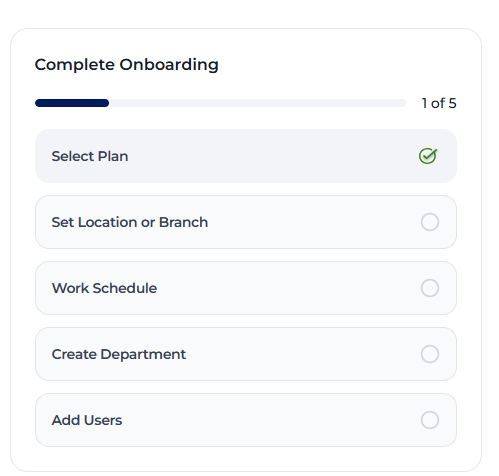
1️⃣ Step 1: Select Plan
Before accessing full system features, choose a subscription tier that fits your workforce size and operational requirements.
- Action: Click Select Plan on the onboarding widget, or navigate to Billing in the sidebar.
- Details: Choose between available plans (e.g., Starter, Professional, or Enterprise). You can subscribe using your prepaid wallet or direct card payment.
- Completion: Once selected, your active subscription card will reflect your plan tier and renewal schedule.
2️⃣ Step 2: Set Location or Branch
Define your physical office addresses, Google Maps coordinates, and geofencing boundaries so the system can verify user attendance.
- Action: Click Set Location or Branch on the onboarding widget, or navigate to Company Settings > Locations.
- Details:
- Click Add New Location.
- Enter the office branch name (e.g., Headquarters, Lagos Branch).
- Use the Google Places search bar to pinpoint your street address on the interactive map.
- Set your allowed Geofence Radius (e.g.,
100 meters).
- Completion: Users (employees, staff, team members, contractors, etc.) will only be allowed to clock in when physically within this radius.
3️⃣ Step 3: Schedule
Configure default working hours, official shift start times, and grace periods for late arrivals—or set up flexible shift rosters.
- Action: Click Schedule on the onboarding widget, or navigate to Company Settings > Schedule / Shifts.
- Details:
- Standard Schedule: Set standard daily shift start and end times (e.g.,
8:00 AM - 5:00 PM) and late threshold rules to automatically categorize punctual vs. late clock-ins. - Shift Schedules (For Shift Employment Types): If Shift was selected as part of your staff employment types during onboarding, navigate to the Shifts tab to create custom Shift Schedules, define Shift Sessions, and build your operational Shift Roster.
- Standard Schedule: Set standard daily shift start and end times (e.g.,
4️⃣ Step 4: Create Department
Organize your workforce into functional units to streamline shift management, supervisor assignments, and group reporting.
- Action: Click Create Department on the onboarding widget, or navigate to Departments in the sidebar.
- Details:
- Click Add Department.
- Enter department names (e.g., Engineering, Human Resources, Sales, Operations).
- Assign department managers or supervisors where applicable.
5️⃣ Step 5: Add Users
Bring your workforce onto the platform by creating user profiles and dispatching mobile registration invites.
- Action: Click Add Users on the onboarding widget, or navigate to Users in the sidebar.
- Details:
- Click Add User or Invite Member.
- Enter user full names, email addresses, phone numbers, assigned office locations, and departments.
- Users will receive an automated invitation link to register their mobile clock-in companion app (
app.workclockhq.com).
[!TIP] Want a guided walkthrough? Run
npm run record:videofrom the project root after starting the dev server. The script will open/employees, wait for your login, record your admin actions, and save a video topublic/docs/admin-guide/employee-onboarding-walkthrough.mp4.
[!TIP] Onboarding Completion: As you finish each task, the radio buttons in the Complete Onboarding widget will automatically check off. Once all 5 steps reach 5 of 5, the checklist widget will hide, leaving your dashboard fully operational!
❓ Frequently Asked Questions (Q&A)
💳 Step 1: Select Plan
Q: Can I change my subscription plan after the initial setup?
A: Yes. You can upgrade or purchase seat and feature add-ons at any time by navigating to the Billing tab in the left sidebar.
📍 Step 2: Set Location or Branch
Q: What happens if a user (employee, staff, team member, contractor, etc.) tries to clock in from outside the geofence radius?
A: The clock-in attempt will be blocked by the mobile companion app, and the system will display a location-mismatch error. This ensures users can only register their attendance when physically present on-site (unless their work status is configured as Flexible, which allows them to clock in and out from anywhere).
🕒 Step 3: Schedule
Q: How does the system handle flexible shifts versus standard office hours?
A: Standard hours (e.g., 8:00 AM - 5:00 PM) apply company-wide by default. If your staff works in shifts, configure Shift Employment Types during onboarding, then create and assign custom Shift Sessions and rosters under Company Settings > Shifts.
🏢 Step 4: Create Department
Q: Can we assign multiple supervisors to a single department?
A: Yes. You can organize your departments into sub-departments under Departments, allowing you to delegate supervisory oversight and group reporting to different managers where needed.
👥 Step 5: Add Users
Q: What should I do if a user does not receive their automated invite link?
A: You can resend the invite at any time. Go to Users, click on the specific user, and select the Resend Invitation option to dispatch a new link.
🏁 Checklist Completion
Q: How do I remove the onboarding checklist widget from the dashboard?
A: The checklist widget will automatically hide as soon as all 5 onboarding steps reach 5 of 5 (fully completed), leaving your dashboard in clean, daily operational mode.
Admin Dashboard Overview
Detailed breakdown of the WorkClock HQ Backoffice Management Dashboard interface, widgets, stat metrics, and navigation.
Company Settings
Complete administrator guide to configuring company profile details, locations, schedules, shifts, holidays, lateness rules, roles, permissions, and security controls.