
User Management & Directory (Employees & Staff)
Comprehensive guide to managing company users (employees, staff members, contractors), inviting team members, performing bulk uploads, configuring work status settings, and tracking user activity.
👥 User Management & Directory (Employees & Staff)
The Users Hub (/employees) is one of the foundational core modules of Work Clock HQ. In the application interface, this section is titled Users and provides administrators and HR managers with centralized control over workforce onboarding, user roles, location assignments, device configurations, and individual activity logs for all company personnel (including regular employees, staff members, contractors, and managers).
🧭 Directory Interface & Navigation
When navigating to the Users section from the main navigation sidebar, administrators are presented with a flexible directory view designed for fast searching and multi-parameter filtering.
[!NOTE] Throughout Work Clock HQ, the term User is used interchangeably with Employee or Staff Member to encompass all active workers registered within your organization.
👥 Workforce Directory Overview

The Users Table provides a comprehensive list of all personnel enrolled in your organization workspace.
User Status Filter Tabs
The top header of the directory features real-time status counters across four distinct views:
- All Users: Displays the complete directory of every user (employee, staff, or contractor) ever added to your organization workspace.
- Active: Filters the list to display currently active users who are authorized to register attendance via mobile apps, web portals, or biometric hardware terminals.
- Inactive: Displays suspended or deactivated user accounts. Deactivated accounts cannot clock in, but all historical attendance and payroll data are preserved.
- Pending: Displays team members who have been sent an email invitation but have not yet completed their account registration.
🏢 Departments Overview Tab
Switching to the Departments tab transforms the view into an interactive card grid representing all operational units in your company:
- Department Cards: Each card displays the department name, total assigned staff count, and the number of sub-departments.
- Side Sheet Quick View: Clicking on any department card opens a sliding side panel showing all users enrolled in that specific department without navigating away from your current workflow.
🔍 Search & Advanced Toolbar Filters
Administrators can pinpoint specific users using the toolbar controls:
- Search Bar: Real-time debounced search by user full name or email address.
- Department Filter: Multi-select dropdown to filter users by one or more specific departments.
- Employment Type Filter: Filter users by working arrangements, including Full-Time, Part-Time, Contract, Remote, Hybrid, On-Site, Temporary, or Intern.
- View Options: Seamlessly switch between standard table row views and mobile-optimized grid card layouts.
➕ Onboarding & Adding Users
Work Clock HQ offers two flexible methods for enrolling users into your workspace: individual manual creation and bulk CSV import.
1. Single User Creation (Add User)
Clicking the Add User button opens a step-by-step enrollment dialog requiring the following configuration details:
| Field Group | Field Name | Description & Guidance |
|---|---|---|
| Personal Info | First & Last Name | Legal user name displayed across logs, reports, and admin headers. |
| Email Address | Primary communication channel. An automated registration invite link will be dispatched here. | |
| Phone Number | Optional contact phone number for SMS notifications and record-keeping. | |
| Work Profile | Employment Type | Classification (e.g., Full-Time, Part-Time, Contract, Remote, Hybrid, On-Site). |
| Department | Primary operational unit (e.g., Engineering, Operations, Sales). | |
| Sub-Department | Optional sub-unit specialization (e.g., Frontend, Quality Assurance). | |
| Assigned Location | Designated office branch or geofence boundary where attendance is tracked. | |
| System Role | Defines workspace permissions (e.g., Staff, HR Manager, System Admin). | |
| Security & Tracking | Heartbeat Tracking | Toggle periodic ping monitoring to verify active app connectivity during shift hours. |
| Biometric Requirement | Require fingerprint or facial verification when clocking in on hardware clocks. |
2. Bulk User Import (Bulk Upload)
For rapid workspace onboarding, organizations can import dozens or hundreds of user profiles simultaneously using a structured spreadsheet.
Step-by-Step Bulk Import Process:
- Download Sample Template: Click the Download Sample link next to the Bulk Upload button to download the official format (
staff_bulk_import_by_Work_Clock_HQ.csv). - Prepare Spreadsheet: Populate the template with mandatory columns:
first_name,last_name,email,phone_number,department,employment_type, andlocation. - Upload File: Click Bulk Upload and select your
.csvor.xlsxfile. - Preparation & Pre-Validation: The Bulk Upload Preparation Modal inspects your file data structure and previews valid records before processing.
- Real-Time Import Progress: A progress bar tracks automated account creation, system database writing, and email invite dispatching.
- Bulk Import Report: Upon completion, a comprehensive summary modal displays:
- Total Processed: Count of total rows analyzed.
- Successfully Imported: Count of accounts successfully provisioned.
- Failed Records: Detailed list of failed rows specifying the exact email address and failure rationale (e.g., duplicate email address, invalid department name).
⚙️ Global & Bulk Workforce Actions
Located directly above the main user list, administrators have access to quick global action buttons:
- 🫀 Assign Heartbeat (Bulk): Opens a dialog allowing administrators to enable or disable automated heartbeat ping tracking across multiple selected users at once.
- 📥 Bulk Upload: Quick launcher for processing staff import files.
- 📥 Download Sample: Direct access to the standardized CSV import schema.
🛠️ Individual User Actions

Clicking the three-dot action menu (···) next to any user row provides granular control over their individual account, permissions, and device links:
[!TIP] Action menu options dynamically adjust based on the selected user's current status and your administrator permission level.
Available Row Actions:
- 👁️ View Details: Navigates directly to the user's dedicated profile hub (
/employees/detail?id={id}). - 🏢 Update Work Status: Adjust working arrangements, toggle flexible clock-out options, configure clock-out grace periods (in minutes), and reassign office branches.
- 🛡️ Assign Admin Role: Grant administrative privileges, elevating regular staff members to System Administrators or HR Managers.
- 🫀 Assign / Unassign Heartbeat: Enable or disable background heartbeat monitoring for the individual user.
- 🖐️ Biometric Verification: Enable or enforce hardware biometric verification (fingerprint or facial recognition) for attendance validation.
- 🔄 Clear Device Logs: Resets local sync logs on hardware clocking devices linked to this user to resolve connection or log duplication issues.
- ✉️ Resend Invitation: (Available for Pending users) Re-dispatches the automated signup email link if an invited user lost or expired their registration link.
- 👤 Disable / Enable User:
- Disable: Temporarily suspends workspace access and prevents clock-ins upon offboarding or leave of absence, while safeguarding historic attendance logs.
- Enable: Instantly restores account access and clock-in privileges for returning users.
- 🗑️ Delete Staff: Permanently purges the user record from the organization workspace.
📊 Individual User Detail Page (/employees/detail)
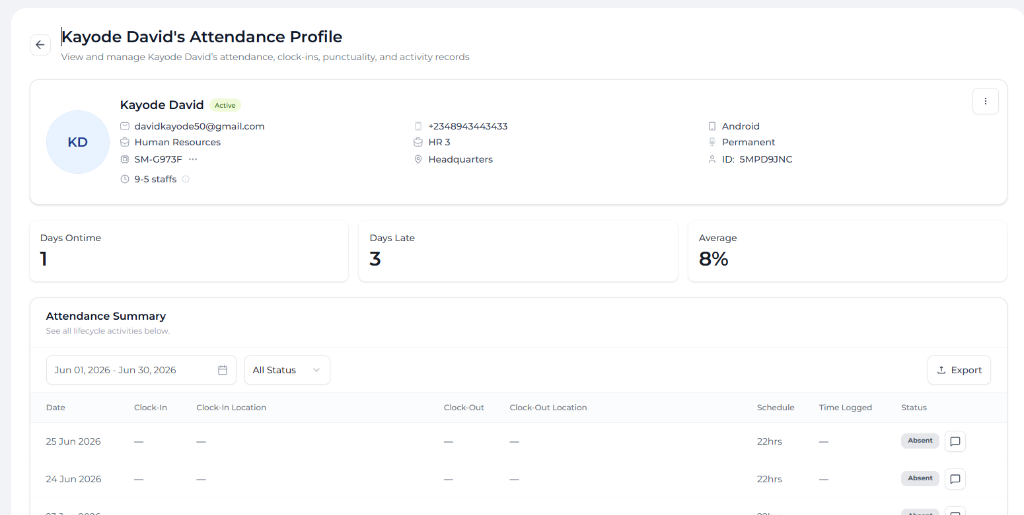
Clicking View Details opens an extensive management hub dedicated entirely to the selected user.
Profile Header Overview
The top header provides quick visual reference data:
- Avatar & Contact Info: Full name, email address, phone number, and current account status badge (Active, Pending, or Inactive).
- Work Context Badges: Assigned department, sub-department, system role, and office location.
- Quick Action Menu: Header action buttons to edit profile details, update work status, or manage account state.
Detail Tabs Breakdown
1. 🕒 Attendance Log Tab
A complete, searchable historical record of every clock-in and clock-out event registered by the user.
- Date Range Filter: Defaults to the current active month (Start of Month to End of Month) with custom date picker selection.
- Log Metrics Table: Displays exact date, scheduled vs actual clock-in times, clock-out times, total calculated work duration, and punctuality status (On Time, Late, Overtime).
- Verification Badges: Indicates whether attendance was verified via GPS geofencing, web portal, or biometric device.
- Comments & Notes: View admin or user notes attached to specific clock-in instances.
- Export to CSV: Click Export to generate an instant CSV download of the filtered attendance log for payroll or audit reference.
2. 📱 Connected Devices Tab
Displays all hardware biometric terminals, desktop applications, or mobile app devices linked to the user's account:
- Device Identifiers: Shows device model, hardware serial/device ID, and last active sync timestamp.
- Device Control: Administrators can remotely reset device sync memory or clear hardware logs specifically associated with this user.
3. 📜 Activity Audit Trail Tab
A chronological event log tracking administrative and system changes made to the user's account over time:
- Account provisioning and registration timestamps.
- Role modifications and permission upgrades.
- Department reassignments and location transfers.
- Enablement and disablement events.
🔐 Permission & Security Requirements
Access to user management features is governed by strictly enforced role-based access control (RBAC):
| Action / Feature | Required Permission Code |
|---|---|
| View User Directory & Profiles | EMPLOYEES.VIEW |
| Add Single User / Bulk Upload / Invite | EMPLOYEES.CREATE |
| Update Work Status / Biometrics / Heartbeat | EMPLOYEES.UPDATE |
| Grant Administrator Roles | ORGANIZATION_ADMINS.CREATE |
| Disable Account Access | EMPLOYEES.DEACTIVATE |
| Reactivate Suspended Account | EMPLOYEES.REACTIVATE |
| Delete User Record | EMPLOYEES.DELETE |
| Clear Hardware Device Logs | ATTENDANCE.EDIT |
❓ Frequently Asked Questions
What happens when I disable a user (employee/staff member)?
Disabling a user immediately revokes their ability to log into Work Clock HQ or register attendance across all mobile, web, and hardware clocking devices. However, all past attendance records, calculated hours, and historical logs remain fully intact for audit and reporting purposes.
How do I fix failed rows during a bulk upload?
Review the Bulk Upload Report Modal shown immediately after the import completes. Note the row numbers and failure reasons (such as a missing department or duplicate email). Correct those specific rows in your CSV file and re-upload them.
Can a user be assigned to multiple locations?
Each user is assigned a primary organization location. However, flexible clock-out rules and grace periods can be configured under Update Work Status to accommodate mobile or roving staff.
Departments & Sub-Departments Management
Comprehensive guide to managing company departments, sub-departments, structural hierarchy rules, deletion conditions, and department head leadership delegation.
Attendance Monitoring & Payroll Reporting
Comprehensive guide to tracking real-time user attendance logs, reviewing GPS geolocation map coordinates, monitoring heartbeat movement logs, inspecting lateness excuses, and exporting payroll reports.